Discharge Measurement SOP
Editable version of SOP available here
Discharge datasheet available here
Concept
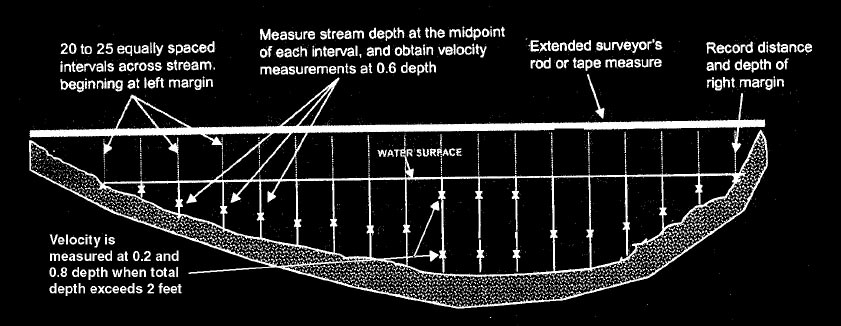
Discharge (flow) is the volume of water moving past a point in a stream in a given amount of time. The most common unit for discharge is cubic feet per second (cfs). Discharge measurement using the Velocity-Area method is accomplished by stretching a tape across the channel, and measuring water depth and velocity at intervals across the stream. The discharge in each segment is calculated and summed to get stream discharge.
Equipment
- Velocity meter (Marsh McBirney Flo-Mate or equivalent)
- Top setting rod
- Tape measure (in 10ths of feet)
- Bank pins (2)
- Datasheet
Selecting a Site
Select a cross section by looking for:
- A relatively straight portion of channel (not on a bend)
- Water is as smooth as possible (not turbulent)
- Water is moving downstream across the entire width (no backwater areas)
- Avoid undercut banks or section with obstacles (such as large rocks or debris)
- Make sure you are capturing all of the flow (there are no side channels)
- It is ideal to select a location with no islands. However, discharge can be measured where an island exists, if the tape is stretched over the island and measurements are taken on both sides of the island.
Finding a good cross section may require altering the stream by removing debris, rocks, or algae. If you do alter the channel, make sure you do it before starting the measurement.
Measuring Discharge
- Stretch a measuring tape across the channel perpendicular to the flow with the zero
end of the tape at the left bank. The left bank is on the left side when looking downstream.
- Secure the tape with bank pins or objects on the bank. Make sure the tape is level, taut, and does not sag too near the water in the middle.
- Record the measurement on the tape at the left and right edges of water (“left wetted edge” and “right wetted edge”). Subtract the left wetted edge value from the right wetted edge value to get the wetted width of the channel.
- Based on the wetted width of the channel, determine the distance between measurement
increments.
- Select a length that will give you at least 20 measurements across the width. An easy way to do this is to divide the wetted width by 20 and round down to a convenient number. This length interval is good for frame of reference, but ideally the interval is decreased in faster/deeper sections and increased in shallower/slower sections so that each of the 20 sections has close to, or less than 5% of the total stream flow.
- Start at the left wetted edge of the channel and record zero depth and zero velocity on the discharge datasheet for that location.
- Move over with the top setting rod one length increment away from the left bank to make the first measurement. Make sure you are standing downstream and away from the rod to avoid your legs altering the flow and affecting the measurement.
- Measure and record the depth. The increments on the rod are in tenths of feet.
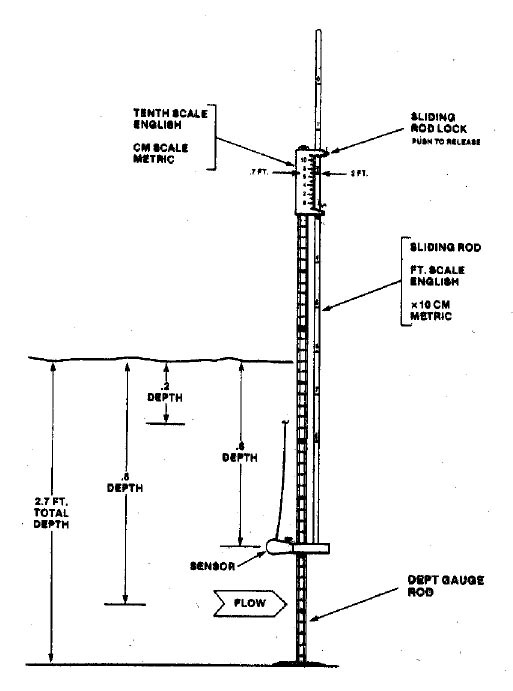
- Adjust the top setting rod so the measurement bulb is at the correct depth and is
facing upstream. If the stream is less than 2.5 feet deep the measurement is taken
at 60% depth (60% of the way down from the surface). If the water is more than 2.5
feet deep, two measurements are taken and averaged, one at 20% and one at 80% depth.
- Depth less than 2.5 ft example: if the water is 1.8 feet deep, align the 1 on the sliding rod with the 8 on the handle of the rod. This will place the bulb at 60% of the 1.8 ft depth.
- Depth more than 2.5 ft example: if the water is 2.6 ft deep, the rod is set at half and then twice the depth for the two readings. Two times 2.6 is 5.2 so you align the 5 on the slider with the 2 on the handle which places the bulb at 20% of the depth. Half of 2.6 is 1.3 so you align the 1 on the slider with the 3 on the handle which puts the bulb at 80% of the depth.
- Once you have positioned the bulb, press the “On/c” button to start the velocity measurement and hold the rod vertical and stationary for 45 seconds. You should see a bar move across the screen as the meter averages the velocity over the 45 second period. Record the velocity on the datasheet.
- Repeat the depth and velocity measurement for each increment across the channel.
- The final set of values recorded should be at the right wetted edge with a depth and velocity of zero.


